Get Started Quickly with Cloud GPU Computing and Build Your Own AI Services!
With the recent surge in artificial intelligence, especially the popularity of large language models (LLMs), the demand for computational resources has skyrocketed. For many people interested in entering the AI field, one major hurdle is the costly and challenging task of acquiring and managing GPU resources. Building your own high-performance GPU workstation involves significant upfront costs and hidden expenses, including ongoing maintenance, electricity costs, and data center management.

Recently, while working on model training, I came across the Glows.ai cloud platform. I noticed there weren’t many tutorials or documentation online, so after spending some time exploring it myself, I found it to be quite user-friendly, affordable, and notably a Taiwanese startup. I’ve therefore put together this article and video tutorial for those who might be interested or have similar needs.
In this guide, I’ll walk through the platform’s features, usage tips, and my personal experiences to help you get started quickly.
Why Choose Glows.ai?
With a background in computer science, I always enjoyed the craftsmanship of assembling my own hardware and initially planned to build my own GPU workstation. However, after experiencing the convenience of Glows.ai’s cloud GPU service, I quickly changed my mind. The platform eliminates the need for extensive hardware preparation and maintenance, allowing me to focus purely on the AI work I genuinely enjoy.
Glows.ai offers three key advantages:
- Flexible GPU Options: Choose from GPUs like the Nvidia RTX 4090 or even the more powerful Nvidia H100 to suit various AI workloads.
- Flexible Billing Model: Glows.ai charges based on actual usage by the second, effectively preventing resource wastage. (Make sure to release resources when not in use to avoid unnecessary charges!)
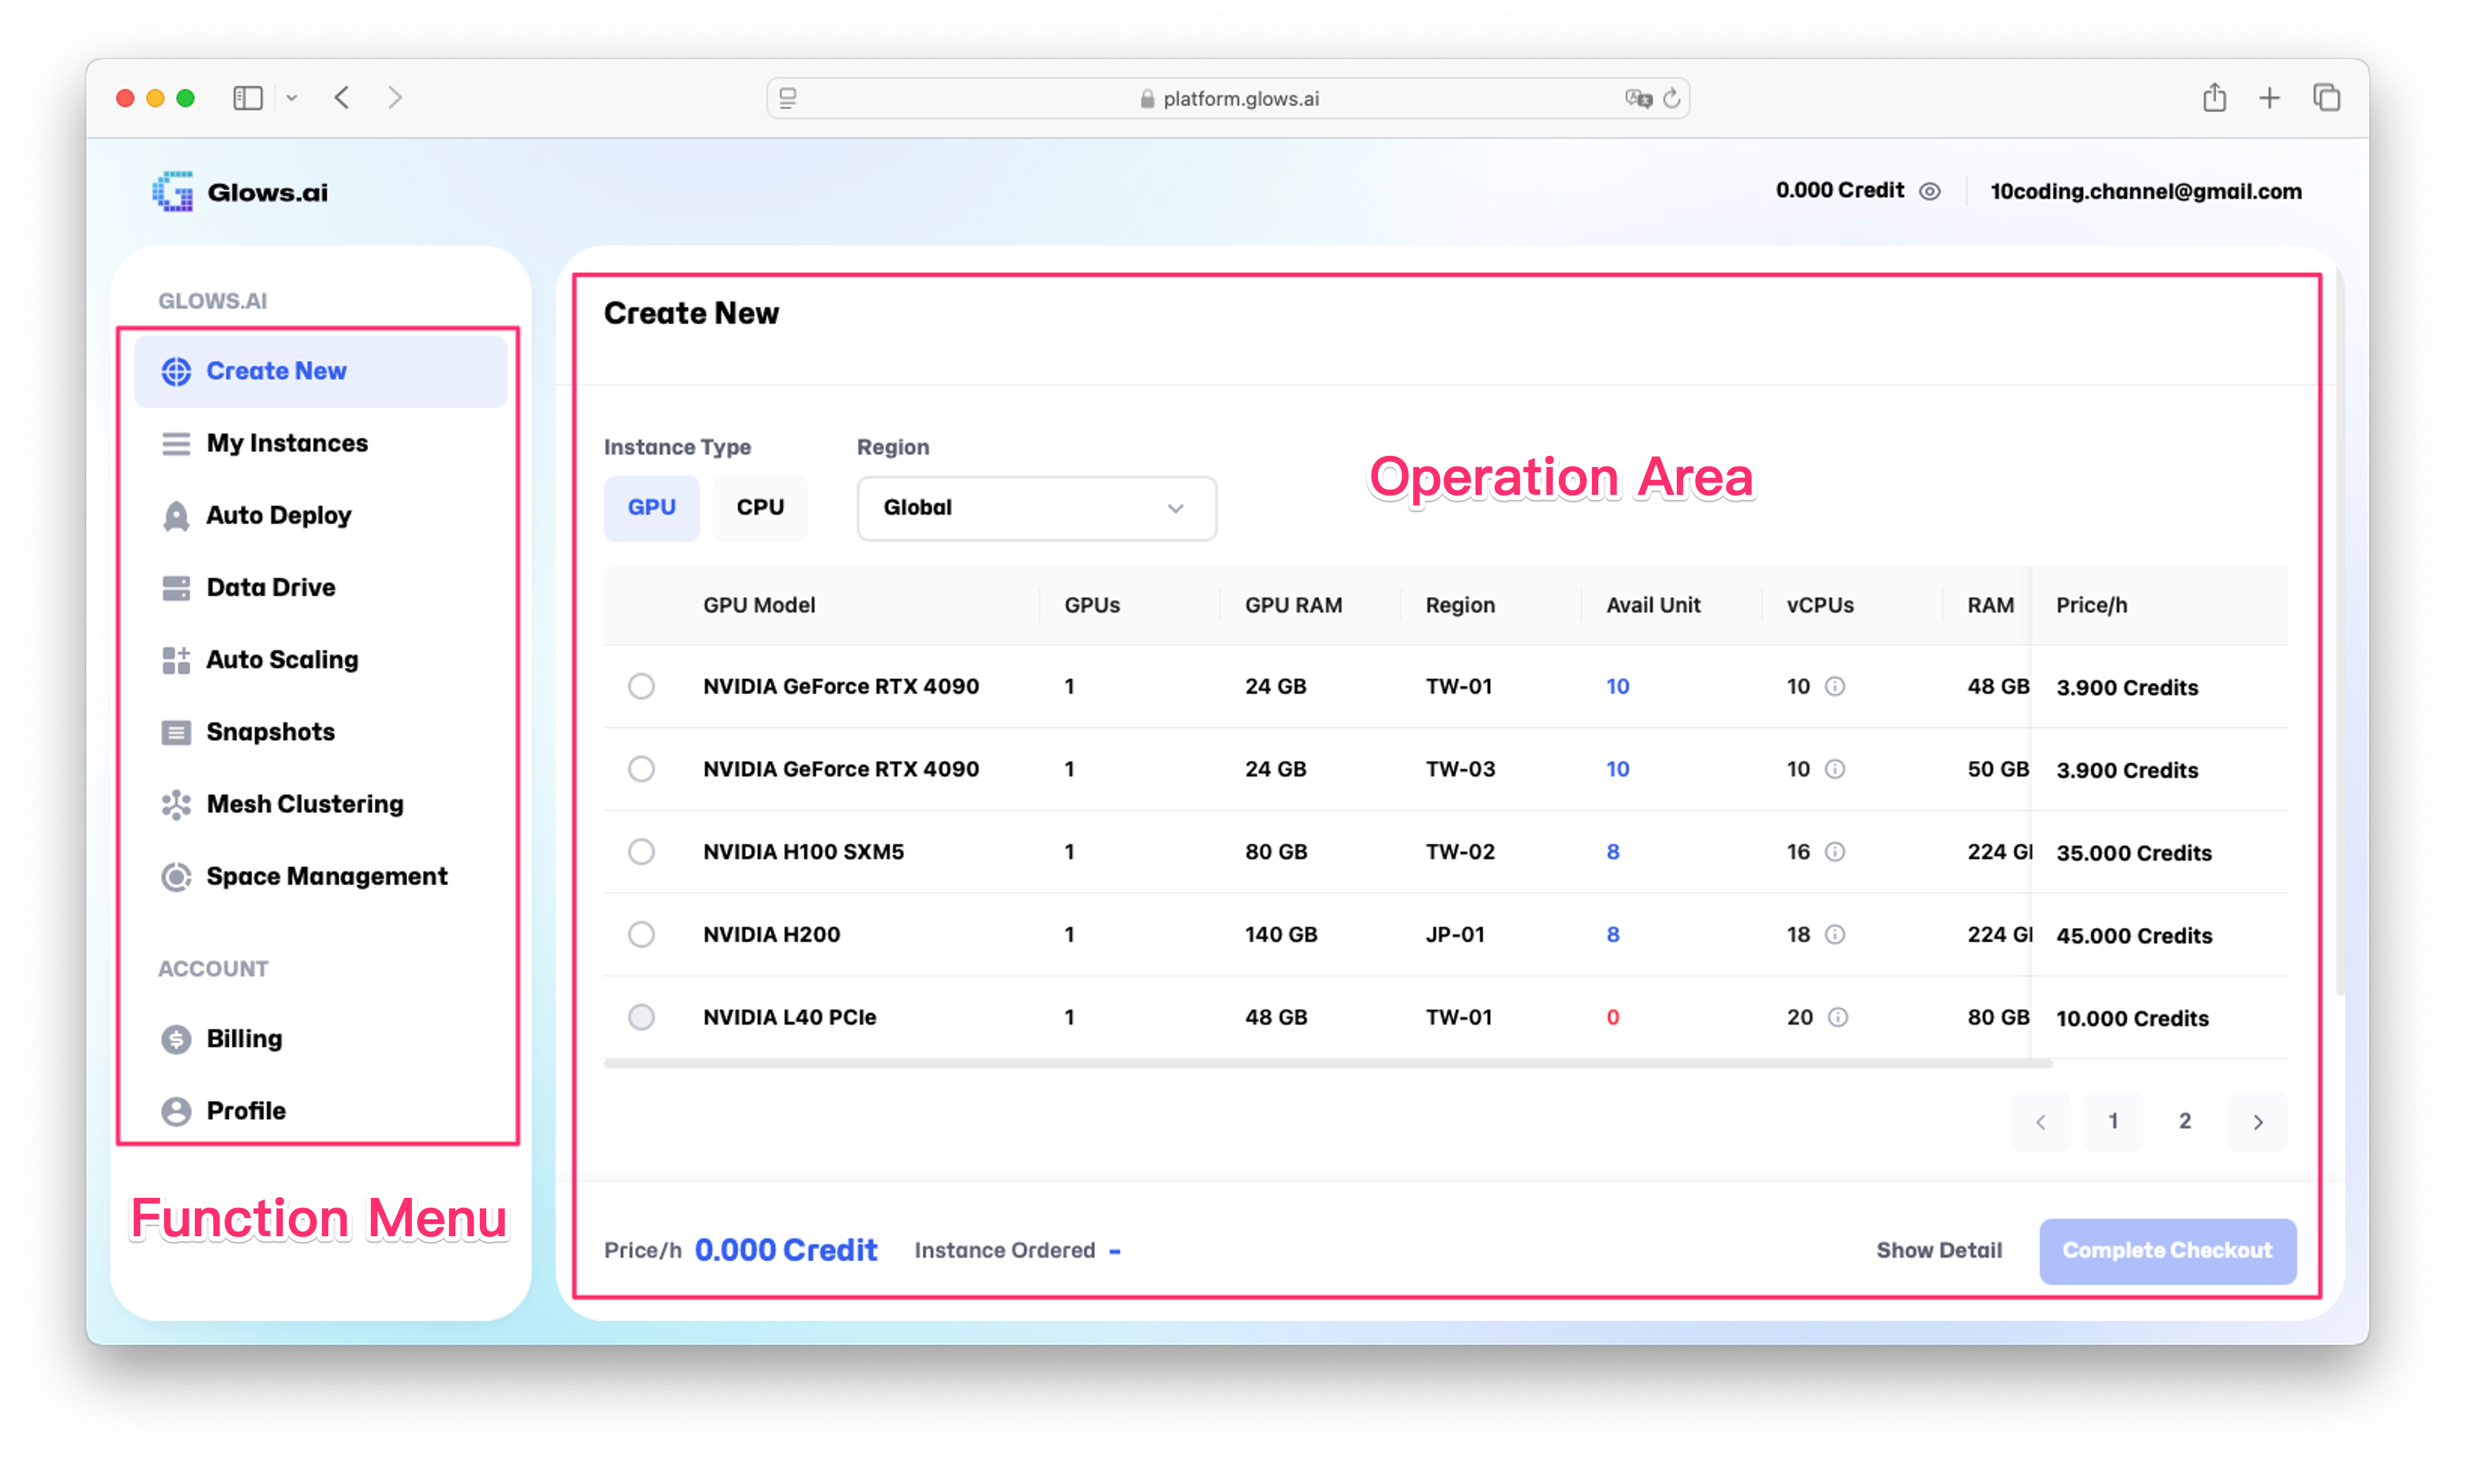
- Comprehensive and User-friendly Interface: Upon registering, you will find nine core functions:
- Create New: Quickly set up GPU virtual machines with no manual environment configuration.
- My Instances: Easily view and manage the status and costs of your virtual machines.
- Data Drive: Centralize and manage datasets and critical files.
- Auto Scaling: Automatically adjust resource usage based on demand.
- Snapshots: Quickly back up and restore environments.
- Mesh Clustering: Optimize resources by enabling collaboration across multiple machines.
- Space Management: Easily manage storage space.
- Billing: Transparent expense tracking and top-up system.
- Profile: Manage personal details and educational verification.
Affordable Computing Costs
Glows.ai offers a cost-effective pay-per-second billing model, allowing you access to high-end GPUs like NVIDIA RTX 4090 or even the more powerful NVIDIA H100 without having to buy expensive hardware. Currently, Glows.ai offers some of the lowest prices on the market. For example, 100 credits (around NT$300) can run an RTX 4090 GPU for approximately 15 hours. Additionally, a limited-time discount is available until May 2025, offering up to 40% off, extending usage to around 25 hours.
Educational institutions or students with extensive computing needs can directly contact the platform for additional discounts after verifying educational status.
How to Get Started with Glows.ai
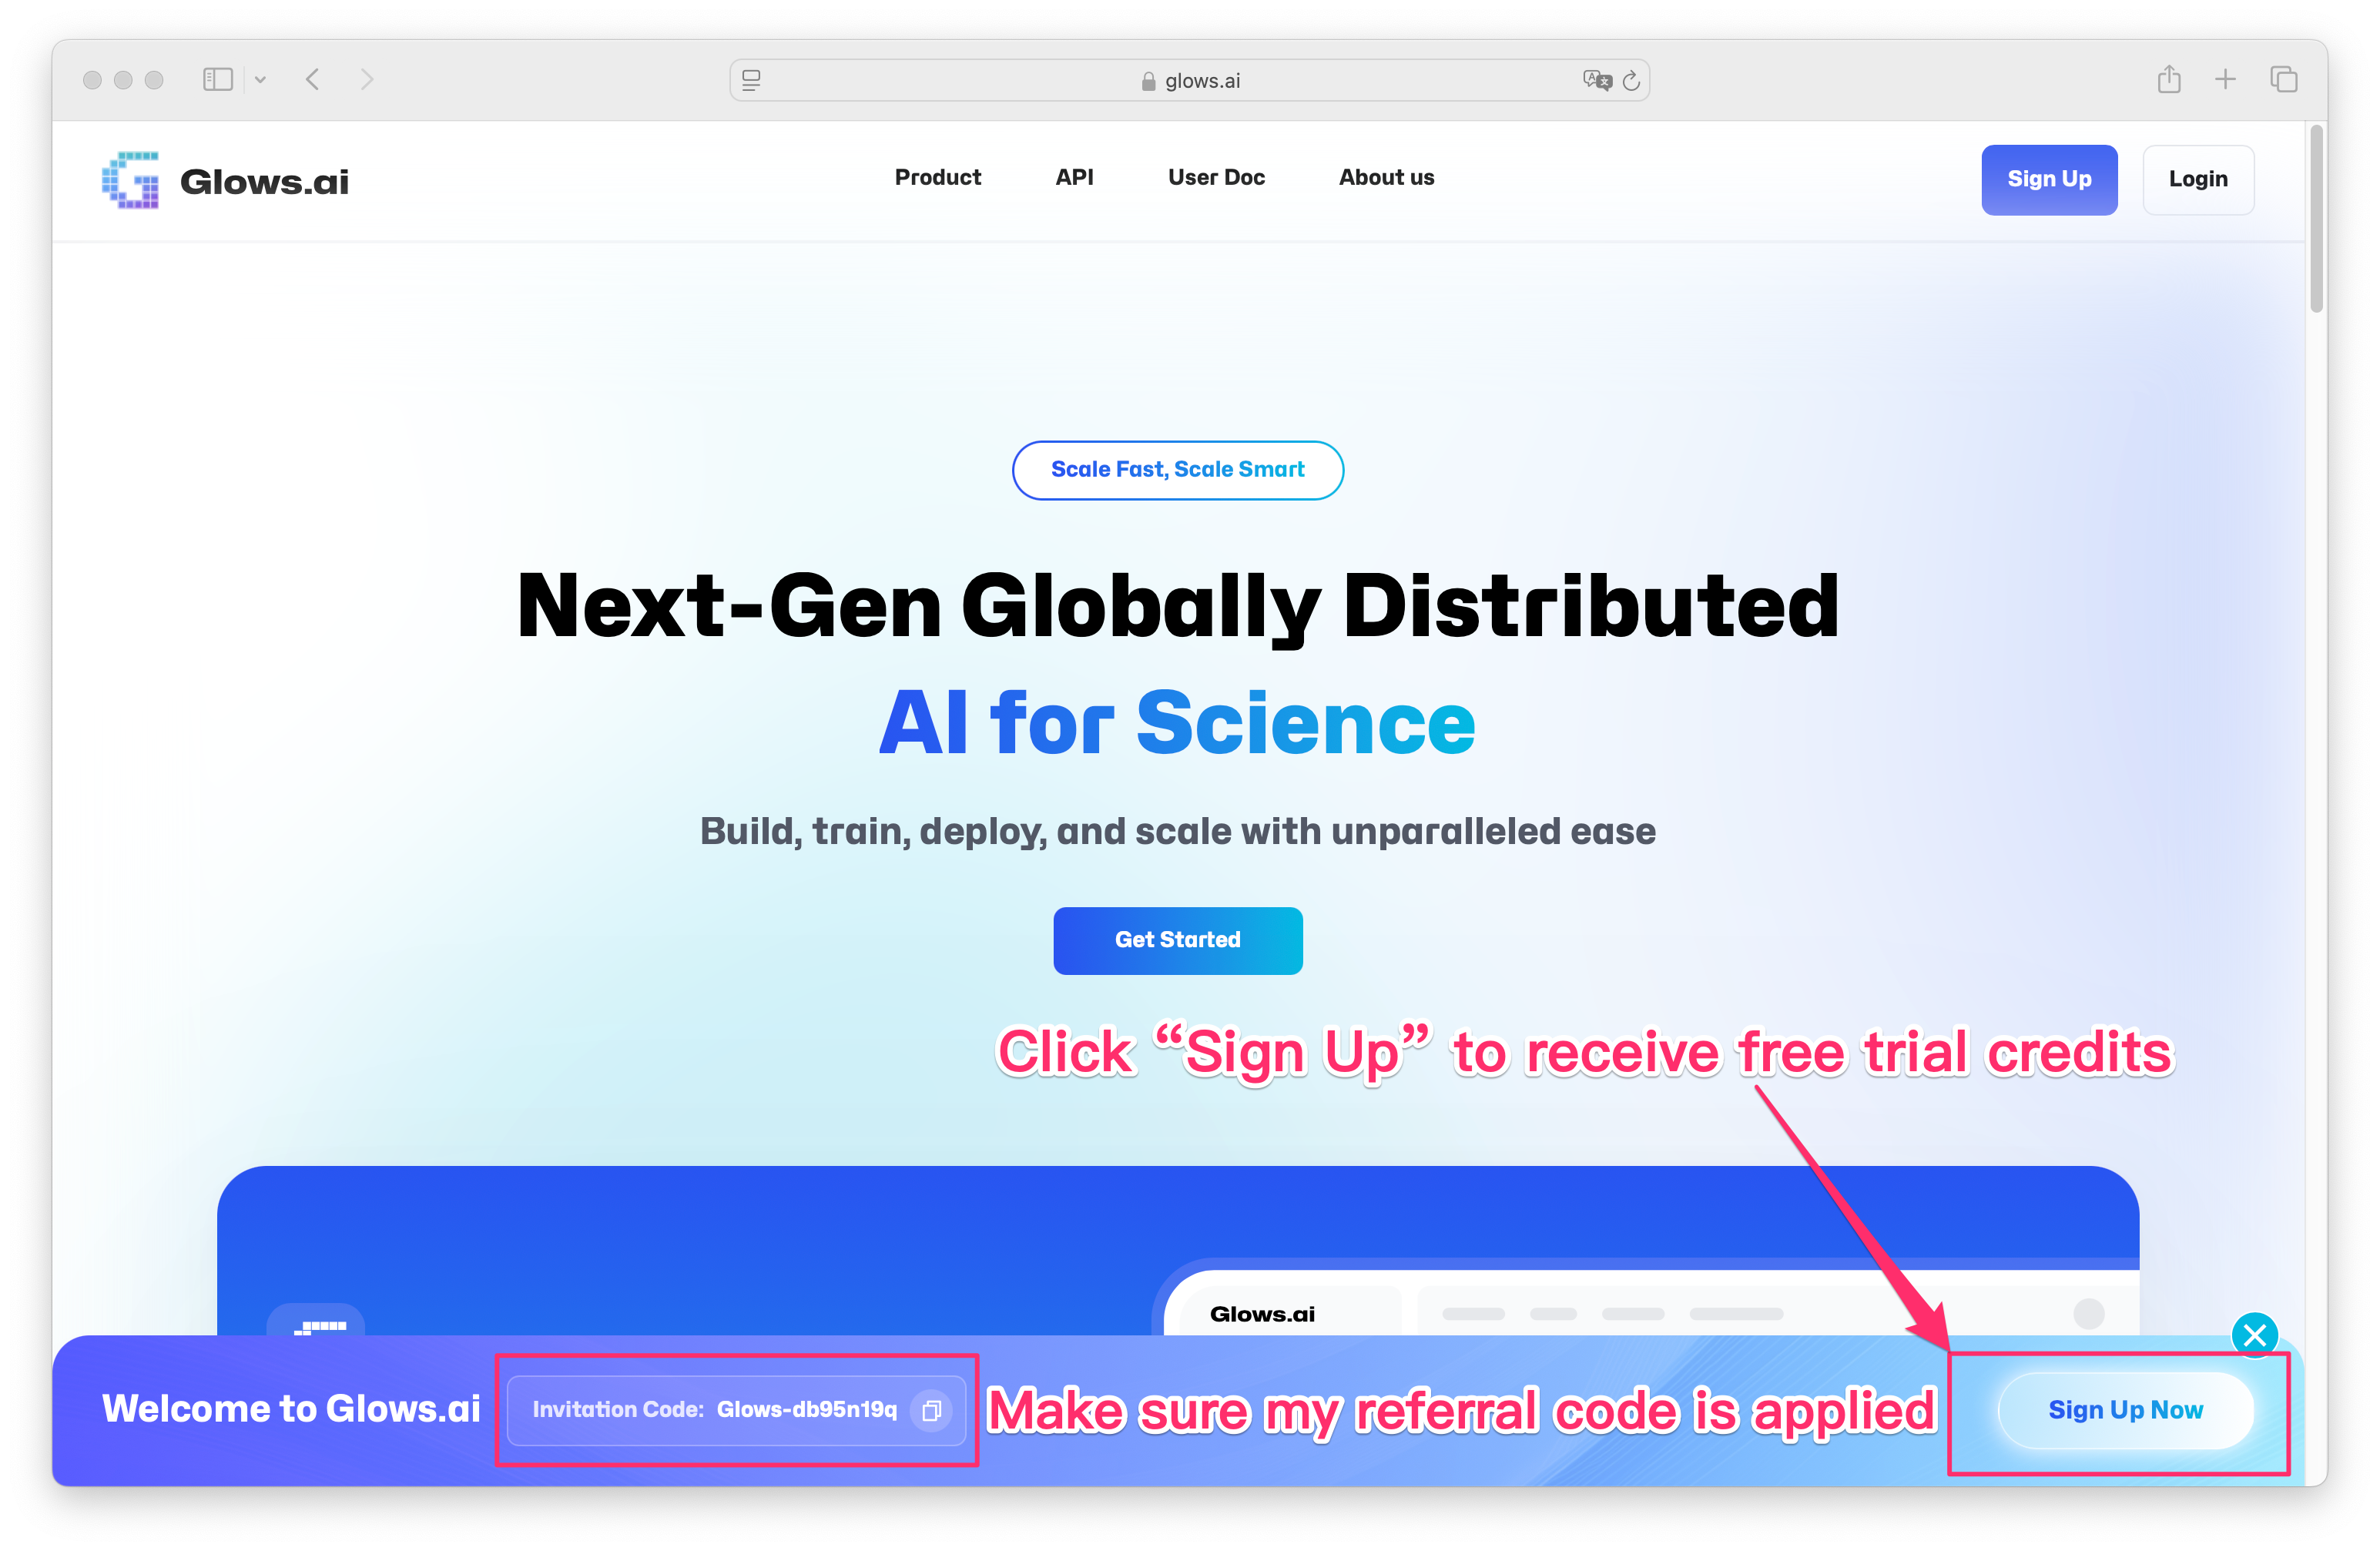
If you haven’t registered a Glows.ai account yet, you can use my referral link to get 10 free trial credits:
👉 https://glows.ai/invite/Glows-db95n19q
Step-by-Step Tutorial: Launching a Glows.ai Instance with Ollama + WebUI
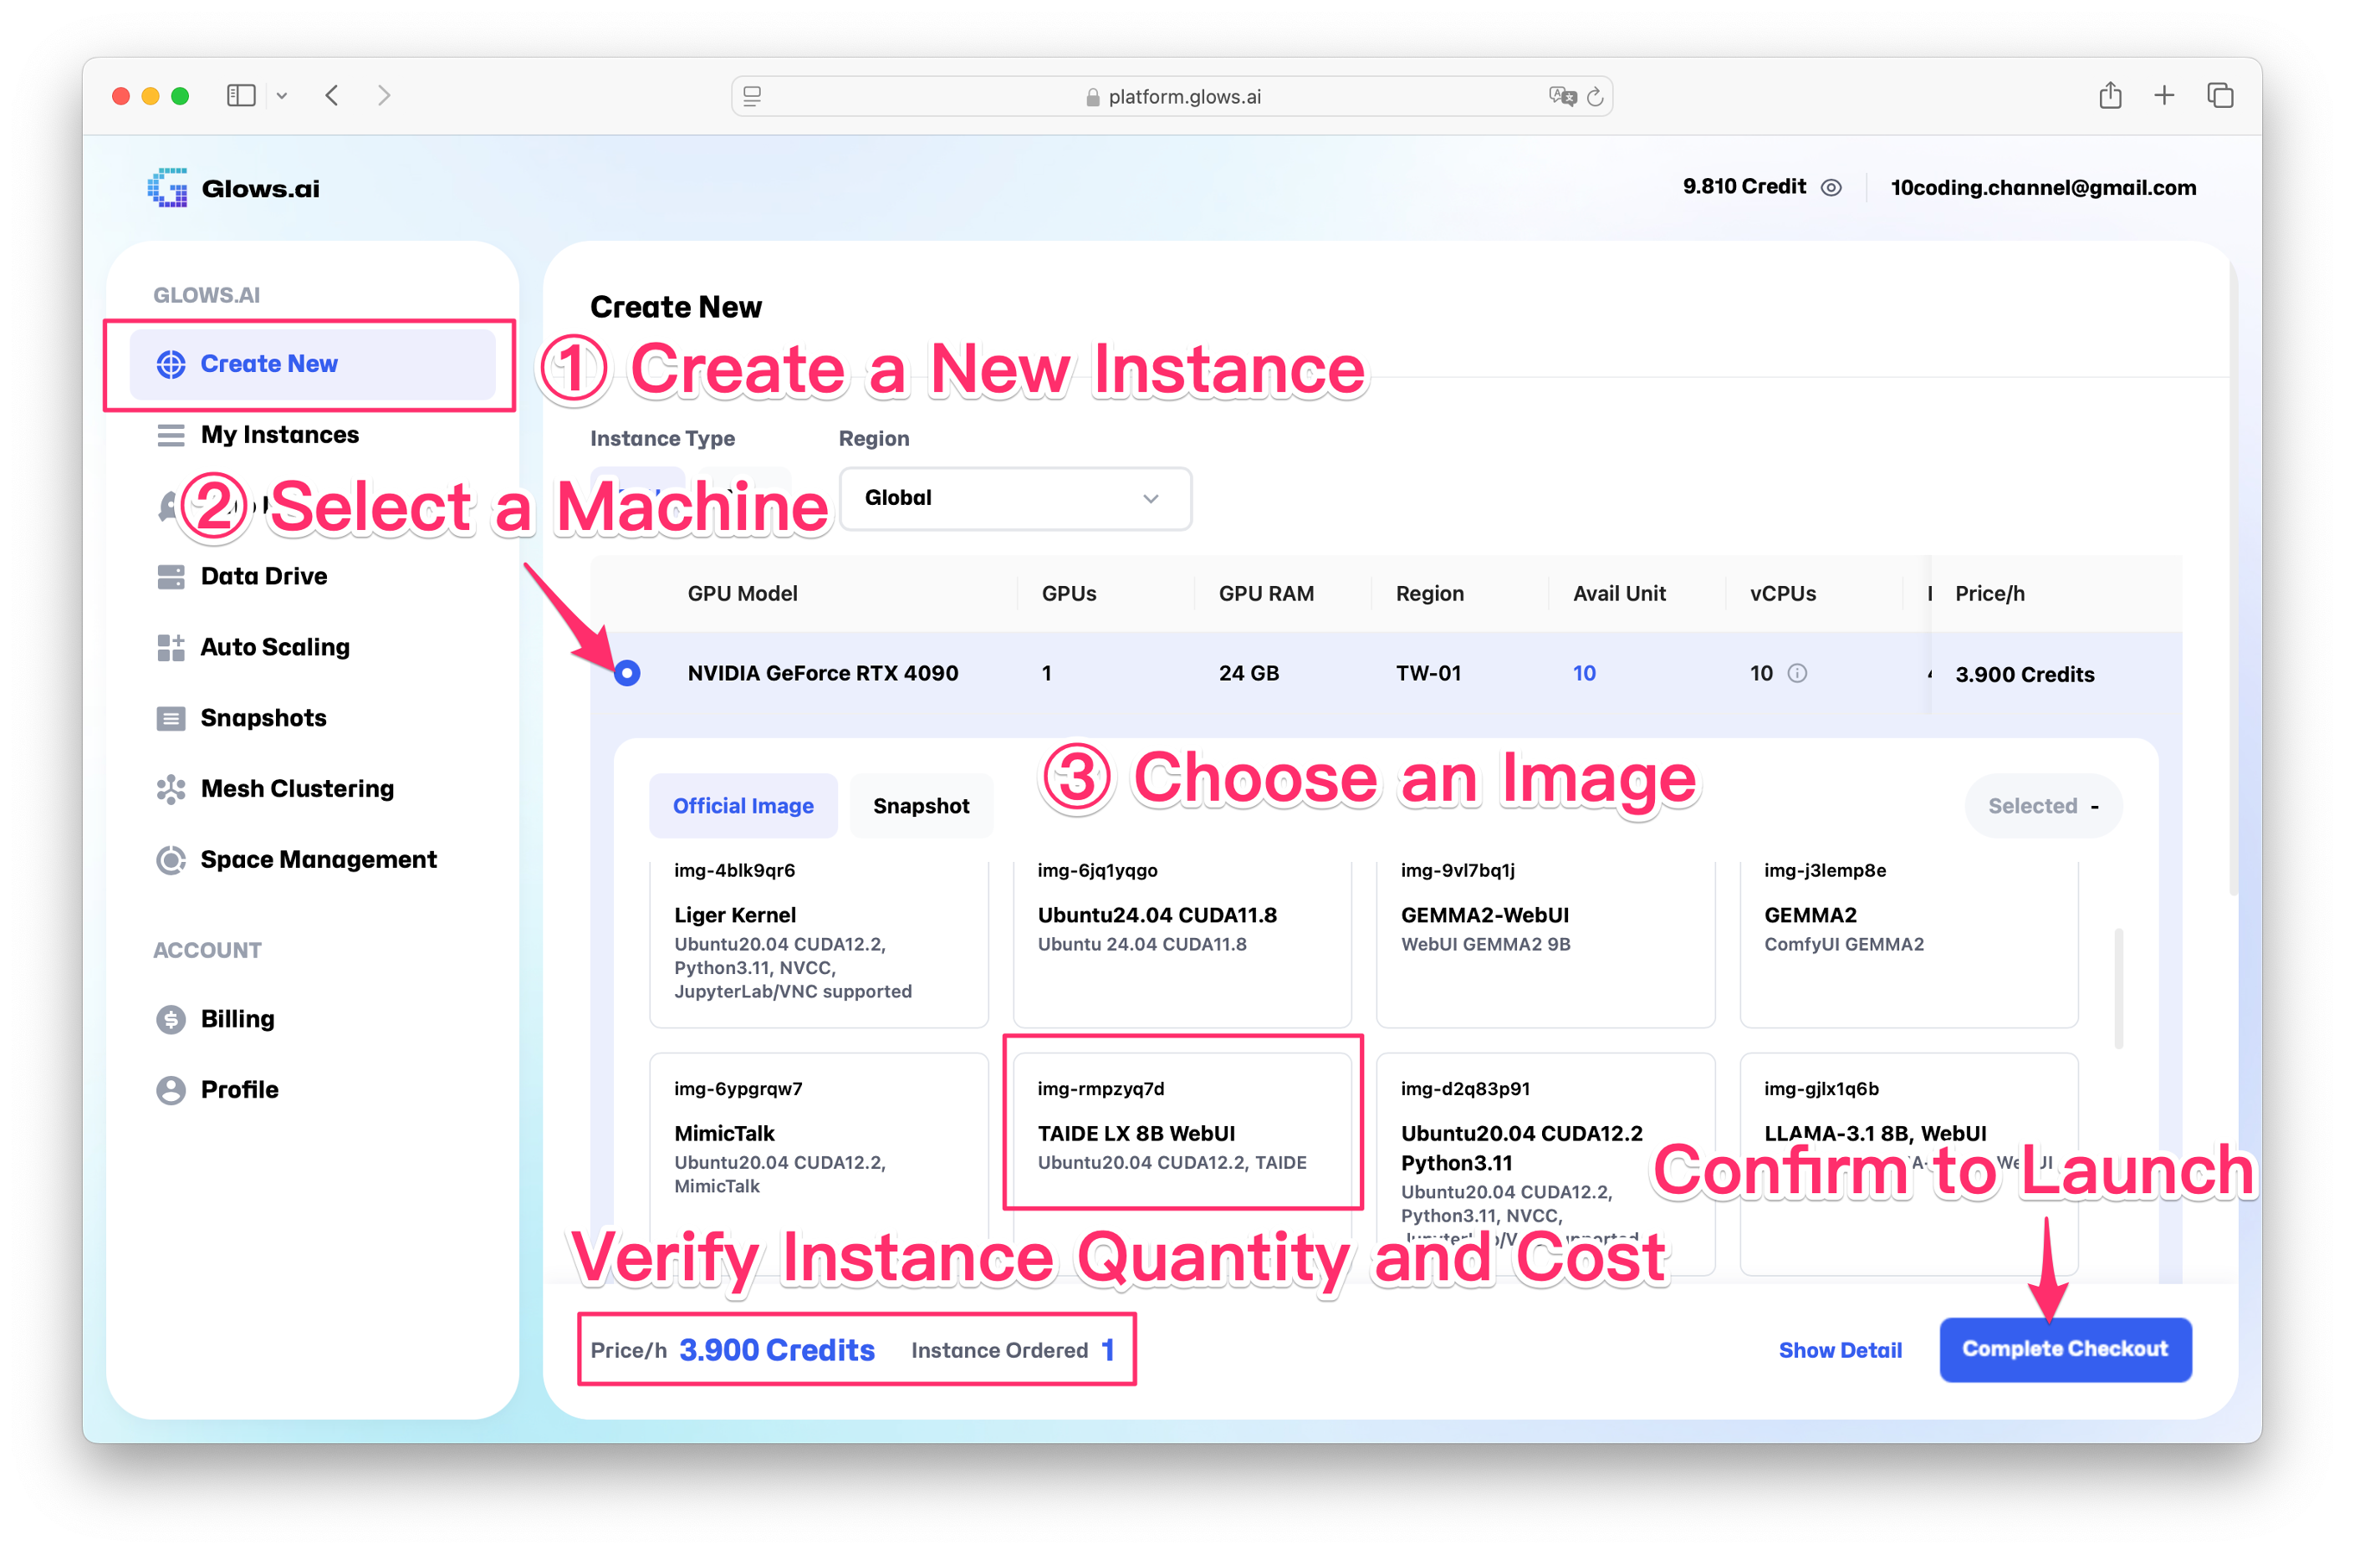
Step 1: Creating a Virtual Machine Instance
- After logging into Glows.ai, click “Create New” on the left.
- Select the desired GPU model (e.g., NVIDIA RTX 4090 or H100).
- Choose an image provided by Glows.ai:
- Pre-configured images include DeepSeek + Ollama + WebUI or Gamma and TAIDE.
- Or select a clean Ubuntu 24.04 image for manual setup.
In this tutorial, we choose the official pre-configured TAIDE LX8B WebUI image, which includes Ollama and WebUI.
Step 2: GPU and Data Disk Configuration
- Typically select one GPU.
- Real-time hourly costs are displayed (approximately 3.9 Credits/hour for RTX 4090, roughly NT$12).
- Optionally attach a personal cloud Data Drive (skip if you don’t have one).
- After configuration, click “Checkout” to start the virtual machine.
Step 3: Wait for the Virtual Machine to Start
- The VM will automatically start, changing from Pending to Running.
- Access the My Instances page to check its status.
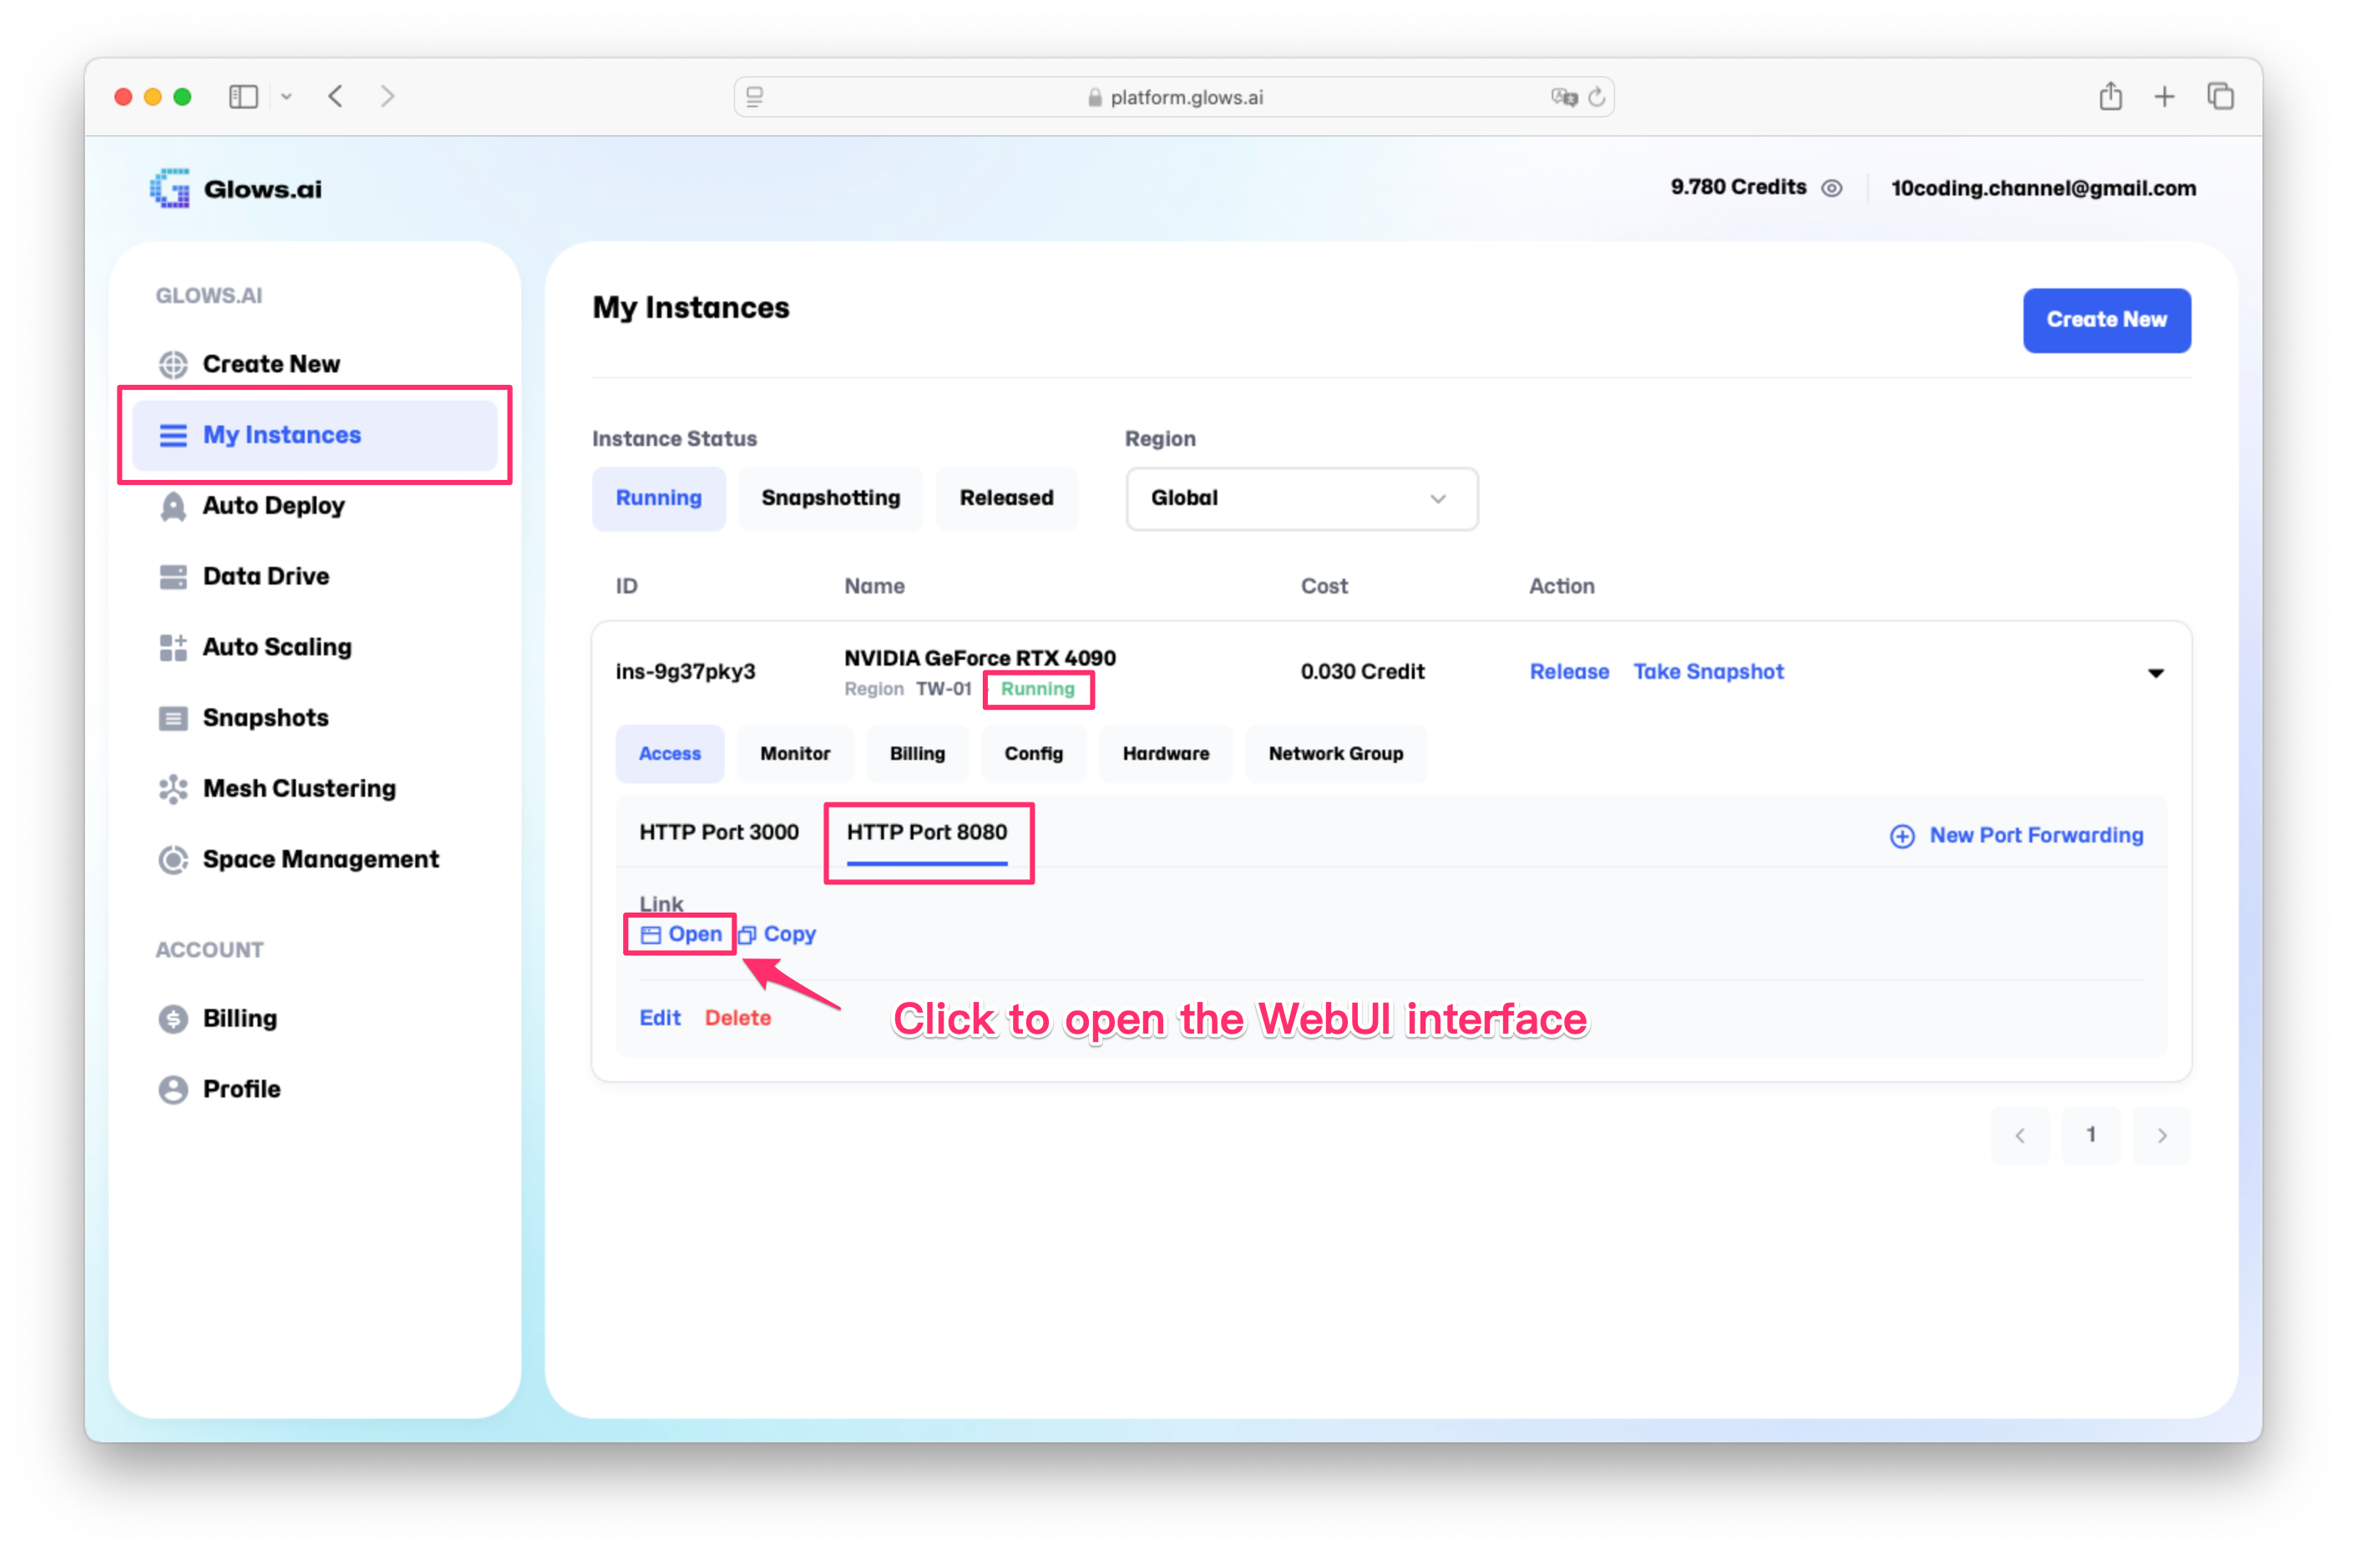
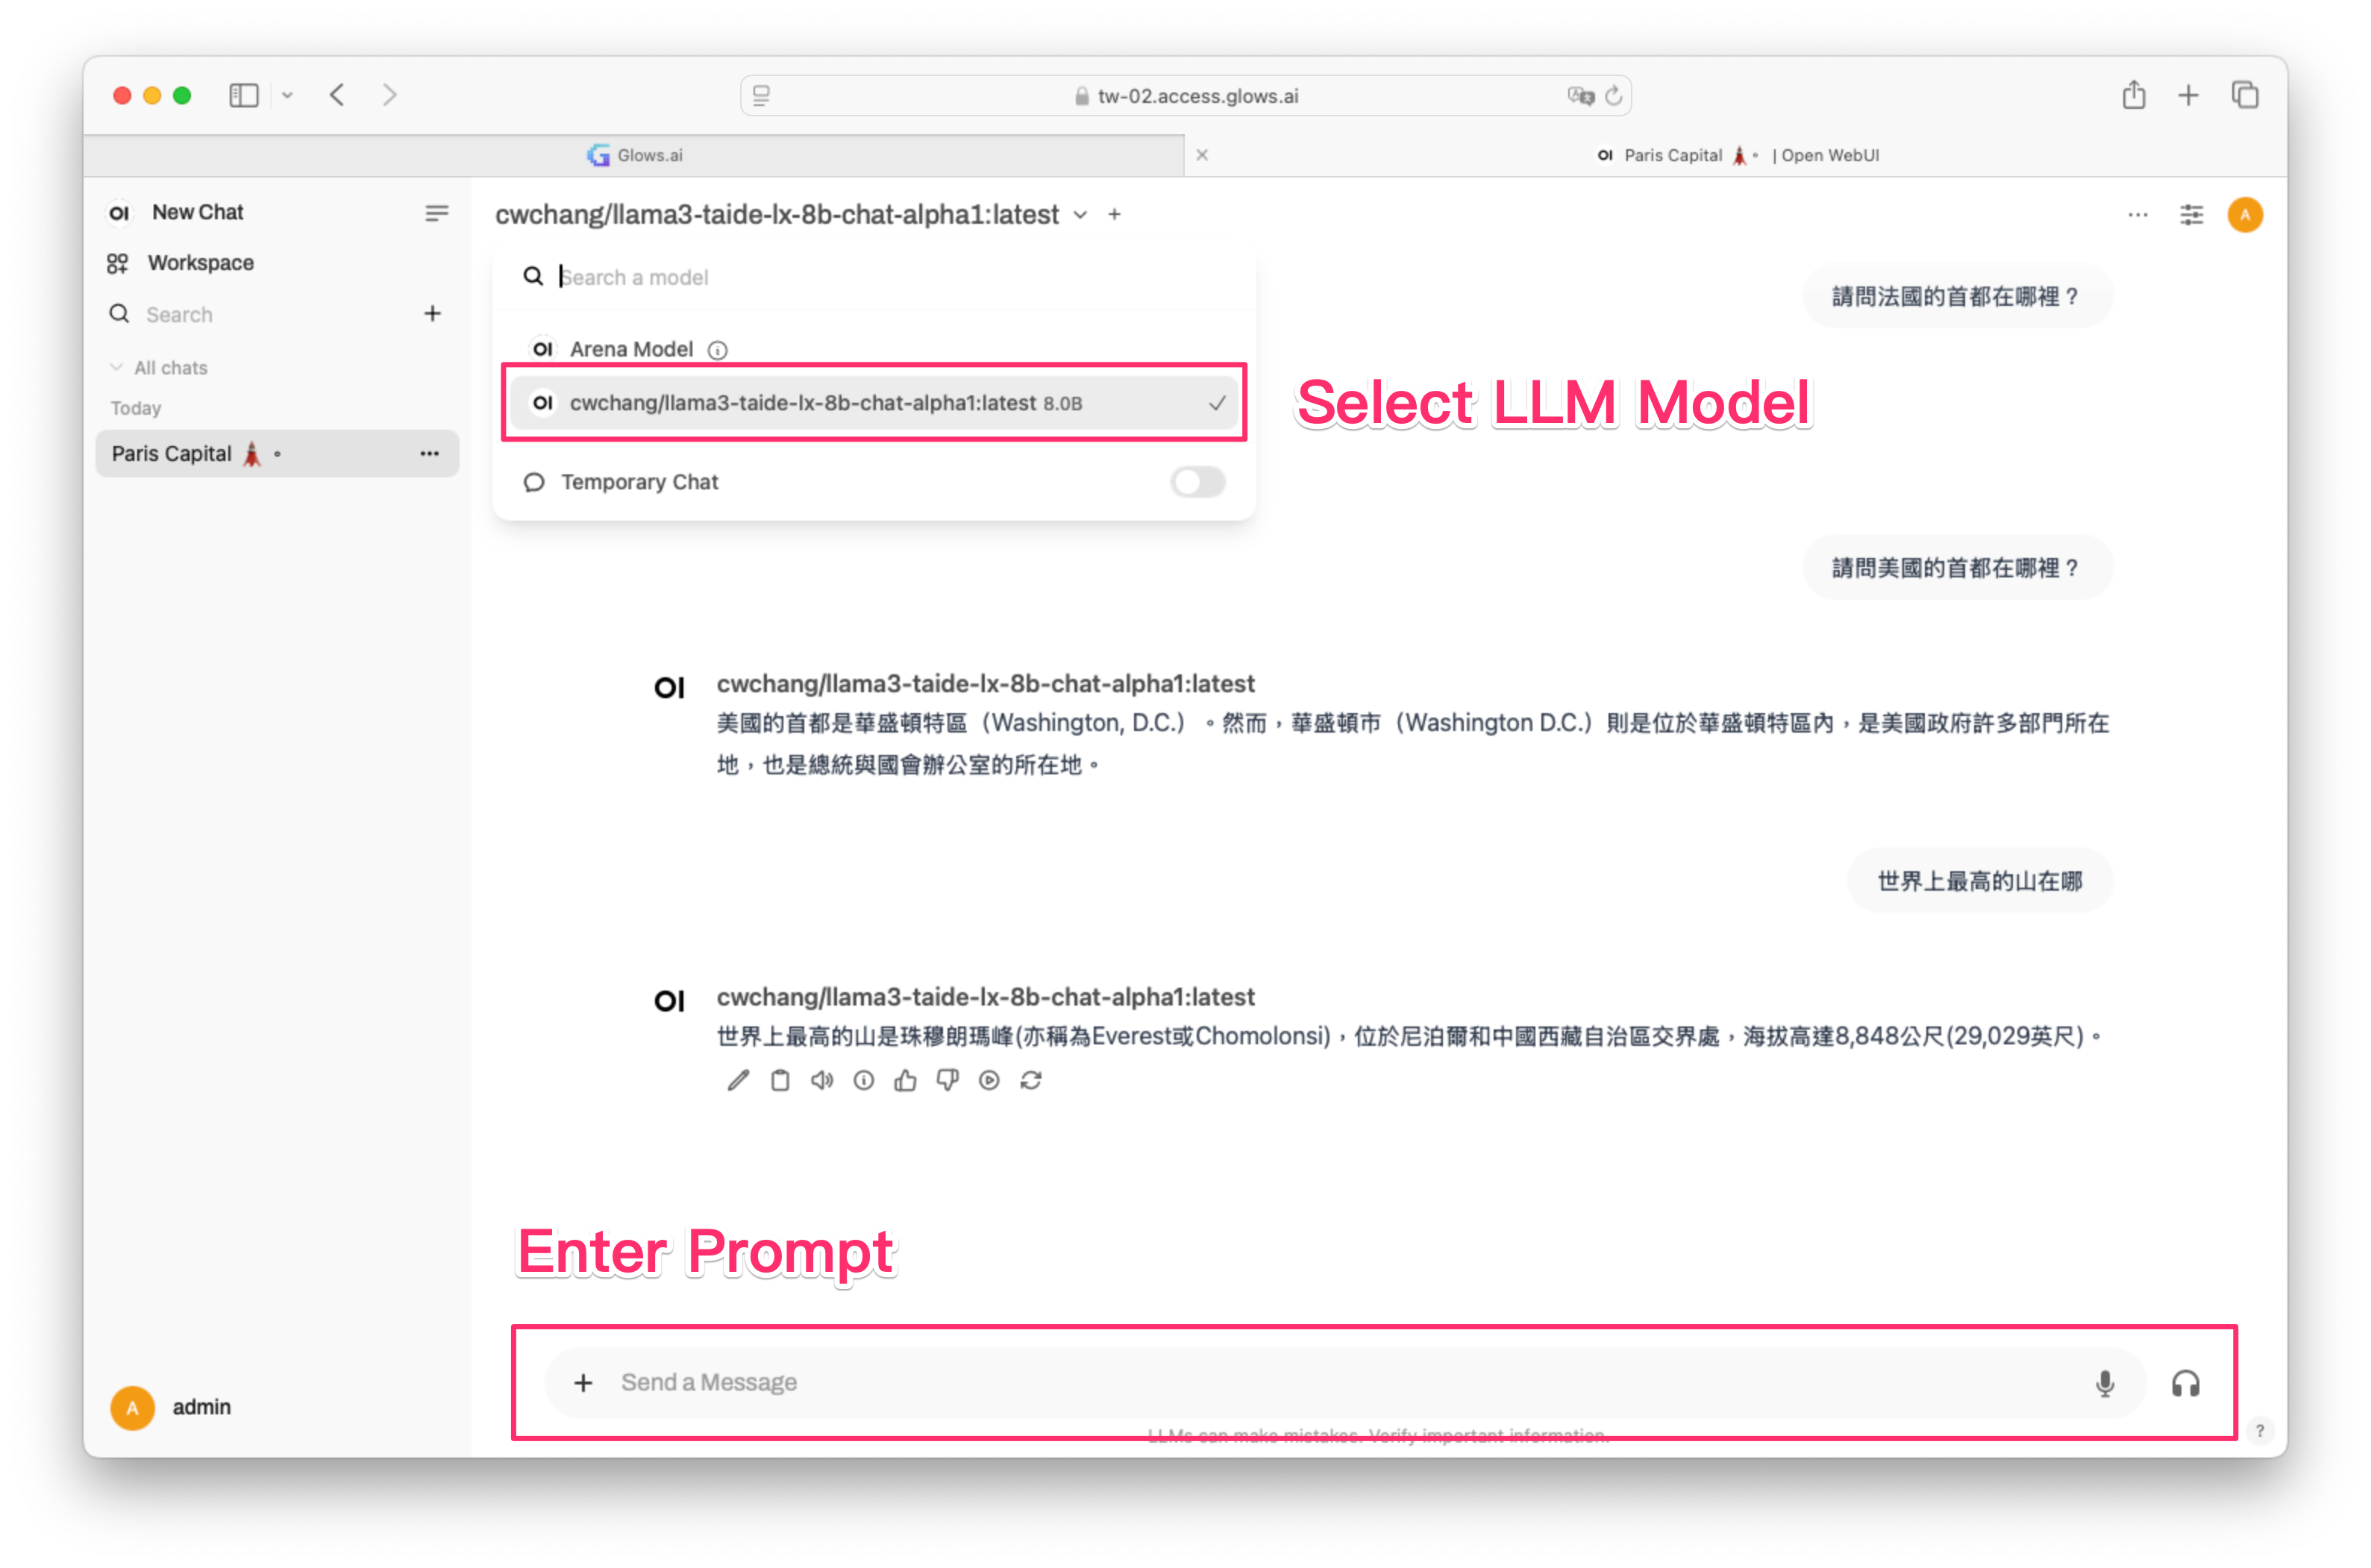
Step 4: Accessing the Ollama + WebUI Interface
- Click the “Access” button next to the VM and select port 8080.
- Open WebUI through the provided link.
- Register an admin account on your first login, and you can immediately start testing AI models.
This completes your basic LLM chatbot deployment, ideal for enterprises prioritizing privacy and local AI service deployment. For further customization, you can use SSH to configure environments on systems like Ubuntu 24.04 Server.
Explore my free eBook series 全民瘋AI系列 [大語言模型應用與實戰] (Crazy about AI: Large Language Models Applications and Practices). This series covers foundational concepts, practical deployments, free-tier API resources, and user-friendly AI tools designed even for non-technical users.
The series covers:
- LLM Fundamentals and Evolution: Introduction to LLM principles, history, and popular models (GPT, Llama, Claude), incorporating notes from Prof. Hung-yi Lee and related podcasts.
- Practical LLM Deployments: Step-by-step tutorials from environment setup to model deployment, including Langchain integration with RAG and Agentic AI.
- Free LLM API Resources: Overview of free-tier resources from various LLM providers for quick project validation.
- Popular No-Code AI Tools: Easy-to-follow guides for non-technical users to integrate generative AI into daily tasks.
Crazy About AI Series – Free eBooks
The Crazy About AI series is an open-source platform dedicated to AI learning resources, created by a passionate group of data science engineers. Its mission is to provide an open and collaborative environment where more people can easily learn about AI and machine learning technologies. Whether you’re a beginner or an advanced user, you’ll find a wide range of learning materials and tools suited to your level.
Thanks to the power of the community, the content is continuously updated — covering everything from foundational theory to real-world applications — to meet the diverse needs of learners at all stages.
- Crazy About AI: Python from Scratch
- Crazy About AI: Classic Machine Learning
- Crazy About AI: Explainable AI
- Crazy About AI: Deep Learning & Neural Networks
- Crazy About AI: Deep Reinforcement Learning
- Crazy About AI: Large Language Model Applications & Practice
 https://www.youtube.com/channel/UCSNPCGvMYEV-yIXAVt3FA5A