前言
上一篇[Android] 內建相機拍照實作(1)已經教各位如何開啟內相機拍照並回傳顯示在APP上,這一篇教學將教你照片的儲存。
Request the camera and Storage feature
在 <manifest></manifest> 標籤內添加以下內容。
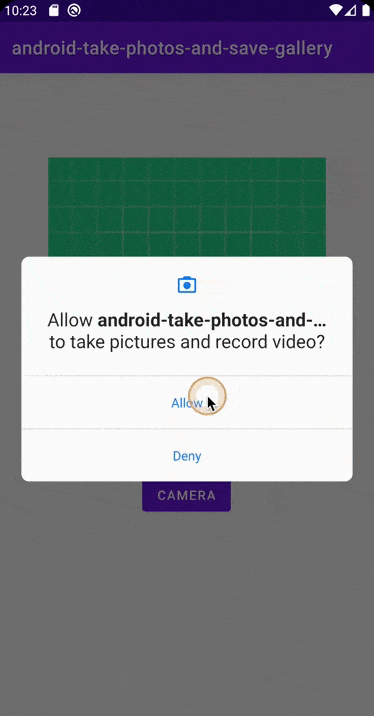
<uses-permission android:name="android.permission.CAMERA"/>
<uses-permission android:name="android.permission.WRITE_EXTERNAL_STORAGE"/>
<uses-permission android:name="android.permission.READ_EXTERNAL_STORAGE"/>
在 AndroidManifest.xml 文件中的 <application></application> 標籤內添加以下標籤。注意 android:authorities 這項屬性的 XXX.android.fileprovider 其中 XXX 是你的專案的前綴(不包含檔名)。

<provider
    android:name="androidx.core.content.FileProvider"
    android:authorities="com.example.android.fileprovider"
    android:exported="false"
    android:grantUriPermissions="true">
    <meta-data
        android:name="android.support.FILE_PROVIDER_PATHS"
        android:resource="@xml/file_paths"></meta-data>
</provider>
如果您的應用以Android 10(API級別29)為目標平台,請停用分區存儲。使更高版本 SDK 能相容。
<manifest ... >
<!-- This attribute is "false" by default on apps targeting
     Android 10 or higher. -->
  <application android:requestLegacyExternalStorage="true" ... >
    ...
  </application>
</manifest>
當您將應用更新為以Android 11(API級別30)為目標平台後,如果應用在搭載Android 11的設備上運行,系統會忽略requestLegacyExternalStorage屬性,因此您的應用必須做好支持分區存儲並為這些設備上的用戶遷移應用數據的準備。
Layout
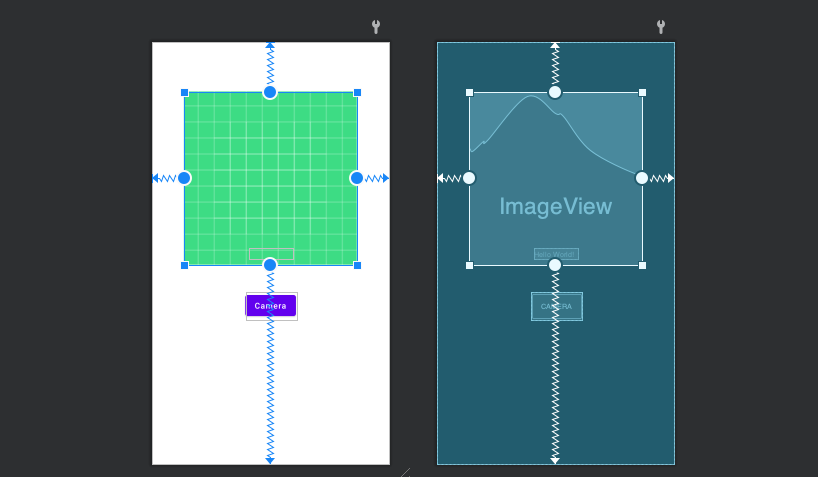
開啟 activity_main.xml 加入一個 ImageView 並將 id 命名為 displayImageView 與 Button 按鈕 id 命名 cameraBtn。
<?xml version="1.0" encoding="utf-8"?>
<androidx.constraintlayout.widget.ConstraintLayout xmlns:android="http://schemas.android.com/apk/res/android"
    xmlns:app="http://schemas.android.com/apk/res-auto"
    xmlns:tools="http://schemas.android.com/tools"
    android:layout_width="match_parent"
    android:layout_height="match_parent"
    tools:context=".MainActivity">

    <ImageView
        android:id="@+id/displayImageView"
        android:layout_width="300dp"
        android:layout_height="300dp"
        app:layout_constraintBottom_toBottomOf="parent"
        app:layout_constraintEnd_toEndOf="parent"
        app:layout_constraintStart_toStartOf="parent"
        app:layout_constraintTop_toTopOf="parent"
        app:layout_constraintVertical_bias="0.23000002"
        app:srcCompat="@drawable/ic_launcher_background" />

    <Button
        android:id="@+id/cameraBtn"
        android:layout_width="wrap_content"
        android:layout_height="wrap_content"
        android:layout_marginTop="40dp"
        android:text="Camera"
        app:layout_constraintEnd_toEndOf="parent"
        app:layout_constraintHorizontal_bias="0.498"
        app:layout_constraintStart_toStartOf="parent"
        app:layout_constraintTop_toBottomOf="@+id/displayImageView" />

</androidx.constraintlayout.widget.ConstraintLayout>
Take a photo with a camera app and save image to gallery
注意在 dispatchTakePictureIntent() 函式中要修改 FileProvider.getUriForFile() 中的 Package 名稱 com.example.android.fileprovider 改成自己的與 AndroidManifest.xml 文件中的 android:authorities 值相同。
public class MainActivity extends AppCompatActivity {

    public static final int CAMERA_PERM_CODE = 101;
    public static final int CAMERA_REQUEST_CODE = 102;
    ImageView selectedImage;
    Button cameraBtn;
    String currentPhotoPath;

    @Override
    protected void onCreate(Bundle savedInstanceState) {
        super.onCreate(savedInstanceState);
        setContentView(R.layout.activity_main);

        selectedImage = findViewById(R.id.displayImageView);
        cameraBtn = findViewById(R.id.cameraBtn);

        // Open Camera
        cameraBtn.setOnClickListener(new View.OnClickListener() {
            @Override
            public void onClick(View v) {
                verifyPermissions();
            }
        });
    }

    private void verifyPermissions(){
        String[] permissions = {Manifest.permission.READ_EXTERNAL_STORAGE,
                Manifest.permission.WRITE_EXTERNAL_STORAGE,
                Manifest.permission.CAMERA};

        if(ContextCompat.checkSelfPermission(this.getApplicationContext(),
                permissions[0]) == PackageManager.PERMISSION_GRANTED
                && ContextCompat.checkSelfPermission(this.getApplicationContext(),
                permissions[1]) == PackageManager.PERMISSION_GRANTED
                && ContextCompat.checkSelfPermission(this.getApplicationContext(),
                permissions[2]) == PackageManager.PERMISSION_GRANTED){
            dispatchTakePictureIntent();
        }else{
            ActivityCompat.requestPermissions(this,
                    permissions,
                    CAMERA_PERM_CODE);
        }
    }
    @Override
    public void onRequestPermissionsResult(int requestCode, @NonNull String[] permissions, @NonNull int[] grantResults) {
        if(requestCode == CAMERA_PERM_CODE){
            if(grantResults.length > 0 && grantResults[0] == PackageManager.PERMISSION_GRANTED){
                dispatchTakePictureIntent();
            }else {
                Toast.makeText(this, "Camera Permission is Required to Use camera.", Toast.LENGTH_SHORT).show();
            }
        }
    }

    @Override
    protected void onActivityResult(int requestCode, int resultCode, @Nullable Intent data) {
        super.onActivityResult(requestCode, resultCode, data);
        if(requestCode == CAMERA_REQUEST_CODE){
            if(resultCode == Activity.RESULT_OK){
                File f = new File(currentPhotoPath);
                selectedImage.setImageURI(Uri.fromFile(f));
                Log.d("tag", "ABsolute Url of Image is " + Uri.fromFile(f));

                Intent mediaScanIntent = new Intent(Intent.ACTION_MEDIA_SCANNER_SCAN_FILE);
                Uri contentUri = Uri.fromFile(f);
                mediaScanIntent.setData(contentUri);
                this.sendBroadcast(mediaScanIntent);
            }

        }
    }

    private File createImageFile() throws IOException {
        // Create an image file name
        String timeStamp = new SimpleDateFormat("yyyyMMdd_HHmmss").format(new Date());
        String imageFileName = "JPEG_" + timeStamp + "_";
//        File storageDir = getExternalFilesDir(Environment.DIRECTORY_PICTURES);
        File storageDir = Environment.getExternalStoragePublicDirectory(Environment.DIRECTORY_PICTURES);
        File image = File.createTempFile(
                imageFileName,  /* prefix */
                ".jpg",         /* suffix */
                storageDir      /* directory */
        );

        // Save a file: path for use with ACTION_VIEW intents
        currentPhotoPath = image.getAbsolutePath();
        return image;
    }

    private void dispatchTakePictureIntent() {
        Intent takePictureIntent = new Intent(MediaStore.ACTION_IMAGE_CAPTURE);
        // Ensure that there's a camera activity to handle the intent
        if (takePictureIntent.resolveActivity(getPackageManager()) != null) {
            // Create the File where the photo should go
            File photoFile = null;
            try {
                photoFile = createImageFile();
            } catch (IOException ex) {

            }
            // Continue only if the File was successfully created
            if (photoFile != null) {
                Uri photoURI = FileProvider.getUriForFile(this,
                        "com.example.android.fileprovider",
                        photoFile);
                takePictureIntent.putExtra(MediaStore.EXTRA_OUTPUT, photoURI);
                startActivityForResult(takePictureIntent, CAMERA_REQUEST_CODE);
            }
        }
    }
}
完整 Code 可以從我的 GitHub 中取得!
後記
如果想要實作從相簿讀取照片可以參考這份範例程式。
鼓勵持續創作,支持化讚為賞!透過下方的 Like 拍手👏,讓創作者獲得額外收入~
版主10在2020年首次開設YouTube頻道,嘗試拍攝程式教學。想要了解更多的朋友歡迎關注我的頻道,您的訂閱就是最大的支持~如果想學其他什麼內容也歡迎許願XD
 https://www.youtube.com/channel/UCSNPCGvMYEV-yIXAVt3FA5A
https://www.youtube.com/channel/UCSNPCGvMYEV-yIXAVt3FA5A